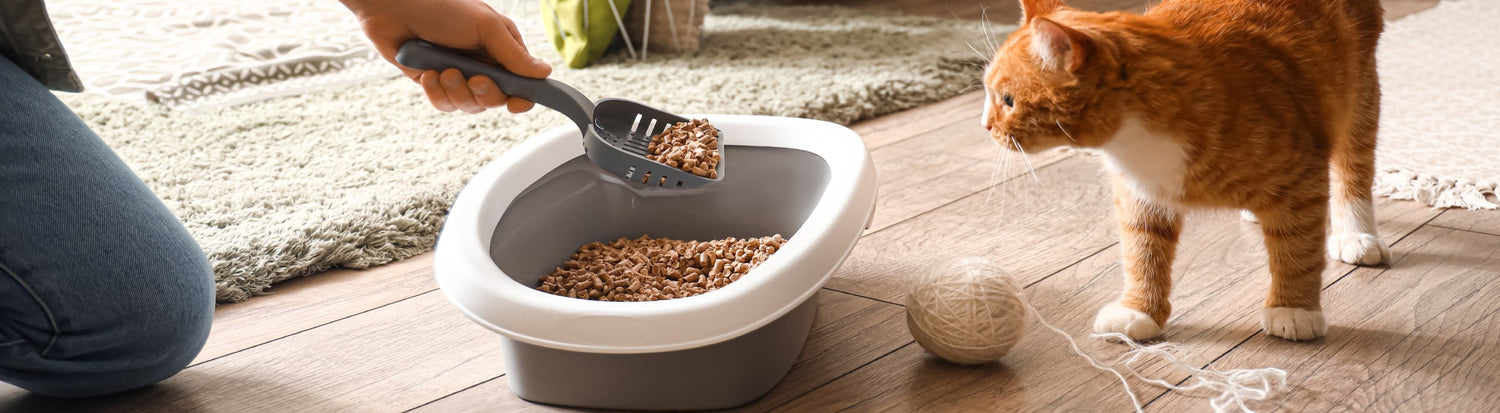
How to Stop Your Cat From Peeing on Your Bed: Expert Solutions and Insights
Having your cat pee on your bed can be frustrating and concerning. It's a common issue faced by many cat owners, and understanding why this behaviour occurs is the first step toward resolving it. In this comprehensive guide, we'll delve into the reasons behind this behaviour and provide effective strategies to prevent your feline friend from turning your bed into their personal litter tray.
Understanding the Reasons Behind the Behaviour
Medical Issues:
Before assuming it's a behavioural problem, rule out any underlying medical conditions. Urinary tract infections, bladder stones, or other health issues might cause discomfort, leading your cat to urinate outside the litter tray, including on your bed.
Stress or Anxiety:
Cats are sensitive creatures, and changes in their environment or routine can cause stress. New pets, visitors, moving to a new house, or even changes in your schedule can trigger anxiety in your cat, resulting in inappropriate urination
Territory Marking:
Cats are territorial animals. They might pee on your bed to mark their territory, especially if they perceive it as a safe and comfortable spot that carries your scent.
Effective Strategies to Prevent Cat Peeing on Your Bed
Consult a Vet: If your cat is suddenly urinating outside the litter tray, a visit to the vet is crucial. Ensure there are no underlying health issues causing this behaviour.
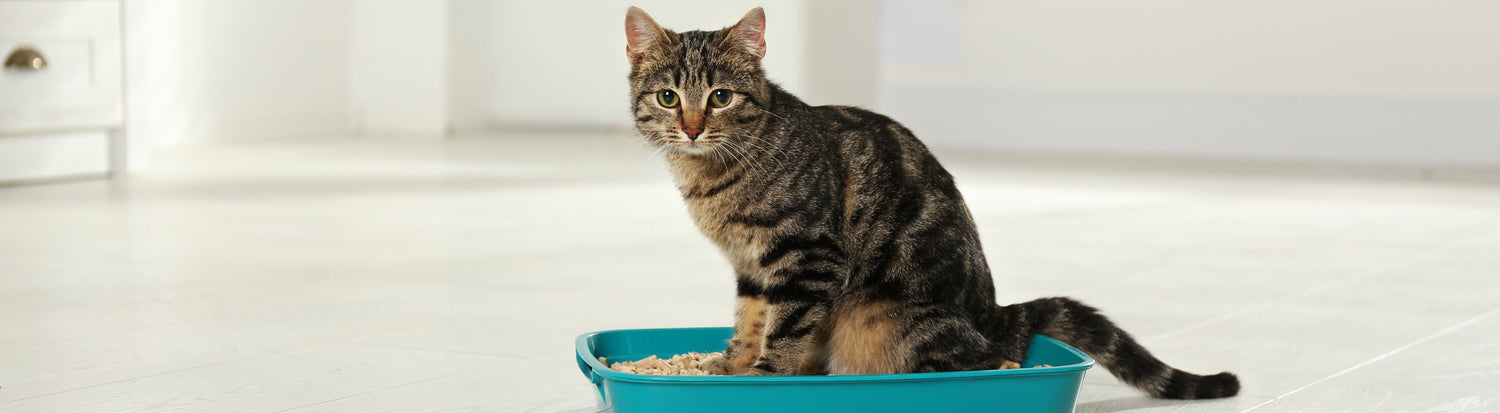
Maintain a Clean Litter Box: Keep the litter tray clean and appealing to your cat. Regularly scoop it and ensure it's in a quiet, accessible location. Some cats are particular about cleanliness and may avoid a dirty litter tray.
Address Stressors: Identify and eliminate stress triggers for your cat. Provide hiding spots, vertical space such as cat trees, and interactive toys to reduce anxiety. Slowly introduce changes to their environment to minimise stress.
Use Positive Reinforcement: When your cat uses the litter tray appropriately, praise and reward them. Positive reinforcement encourages desired behaviour.
Modify Bed Access: Prevent access to your bed when you're not around. Close doors or use deterrents like aluminium foil or double-sided tape to discourage them from getting on the bed.
Utilise Scent Neutralisers: Thoroughly clean any urine spots with enzymatic cleaners to eliminate the odour. Cats may revisit places they've previously marked, so neutralising the scent is crucial.
Understanding why your cat is urinating on your bed is pivotal in finding a solution. Remember, patience and consistency are key. With a systematic approach that involves addressing potential health issues, reducing stress factors, and positive reinforcement, you can help your cat reestablish appropriate litter tray behaviour and keep your bed urine-free.
If the problem persists despite your efforts, seeking guidance from a certified animal behaviourist or a veterinarian specialising in feline behaviour can provide further insights tailored to your cat's specific needs.
By implementing these strategies and showing understanding towards your feline companion, you can successfully tackle this unwanted behaviour and restore harmony in your home.
Having your cat pee on your bed can be frustrating and concerning. It's a common issue faced by many cat owners, and understanding why this behaviour occurs is the first step toward resolving it. In this comprehensive guide, we'll delve into the reasons behind this behaviour and provide effective strategies to prevent your feline friend from turning your bed into their personal litter tray.
Understanding the Reasons Behind the Behaviour
Medical Issues:
Before assuming it's a behavioural problem, rule out any underlying medical conditions. Urinary tract infections, bladder stones, or other health issues might cause discomfort, leading your cat to urinate outside the litter tray, including on your bed.
Stress or Anxiety:
Cats are sensitive creatures, and changes in their environment or routine can cause stress. New pets, visitors, moving to a new house, or even changes in your schedule can trigger anxiety in your cat, resulting in inappropriate urination
Territory Marking:
Cats are territorial animals. They might pee on your bed to mark their territory, especially if they perceive it as a safe and comfortable spot that carries your scent.
Effective Strategies to Prevent Cat Peeing on Your Bed
Consult a Vet: If your cat is suddenly urinating outside the litter tray, a visit to the vet is crucial. Ensure there are no underlying health issues causing this behaviour.
Maintain a Clean Litter Box: Keep the litter tray clean and appealing to your cat. Regularly scoop it and ensure it's in a quiet, accessible location. Some cats are particular about cleanliness and may avoid a dirty litter tray.
Address Stressors: Identify and eliminate stress triggers for your cat. Provide hiding spots, vertical space such as cat trees, and interactive toys to reduce anxiety. Slowly introduce changes to their environment to minimise stress.
Use Positive Reinforcement: When your cat uses the litter tray appropriately, praise and reward them. Positive reinforcement encourages desired behaviour.
Modify Bed Access: Prevent access to your bed when you're not around. Close doors or use deterrents like aluminium foil or double-sided tape to discourage them from getting on the bed.
Utilise Scent Neutralisers: Thoroughly clean any urine spots with enzymatic cleaners to eliminate the odour. Cats may revisit places they've previously marked, so neutralising the scent is crucial.
Understanding why your cat is urinating on your bed is pivotal in finding a solution. Remember, patience and consistency are key. With a systematic approach that involves addressing potential health issues, reducing stress factors, and positive reinforcement, you can help your cat reestablish appropriate litter tray behaviour and keep your bed urine-free.
If the problem persists despite your efforts, seeking guidance from a certified animal behaviourist or a veterinarian specialising in feline behaviour can provide further insights tailored to your cat's specific needs.
By implementing these strategies and showing understanding towards your feline companion, you can successfully tackle this unwanted behaviour and restore harmony in your home.
SIGN UP FOR USEFUL TIPS & GUIDES STRAIGHT TO YOUR INBOX
Next Article
Owning a Dog
Understanding Dog Park Etiquette as a New Dog Parent
Why Do Dogs Roll in Foxes' Poo: Understanding Canine Behaviour
Related Articles
30.06.25June 30, 2025Health
How to Choose the Best Brush for Your Dog: A Guide for Every Coat Type
Grooming is an essential part of maintaining your dog’s health and happiness. From preventing painful tangles to keeping shedding under control, the right brush can make a huge difference in your routine. In this guide, we’ll walk you through all the information you need—plus a few expert dog grooming tips—to help you choose the best brush for dog grooming based on your pup’s unique coat. Whether you have a short-haired, long-haired, curly-haired, wire-haired, silky-haired, or double-coated dog, we’ve got you covered. We’ll also explore how often you should brush your dog’s hair and how to introduce brushing to puppies or reluctant adult dogs. By the end, you’ll be well on your way to giving your pet the best grooming experience possible.
Why the Right Brush Matters
A brush is more than a grooming accessory—it’s a key tool that can help:
Reduce Shedding: Regular brushing removes loose hairs before they end up on your furniture.
Prevent Mats and Tangles: This is particularly important for long-haired and curly-haired breeds.
Stimulate Healthy Skin and Coat: The gentle massaging action of brushing can improve blood circulation.
Strengthen Your Bond: Grooming sessions can become a relaxing ritual that builds trust between you and your dog.
With so many brushes on the market, it can be tricky to know which is the best brush for dog grooming. Understanding the specifics of your dog’s coat type is the first step in making the right choice.
Best Brush for Short-Haired Dogs
Short-haired breeds (like Beagles, Boxers, and Dalmatians) have smooth coats that lie close to the skin. While these dogs don’t typically form tangles, they can still shed a considerable amount. A bristle brush or a grooming glove is usually the best brush for short haired dogs because:
Bristle Brush: The soft bristles help remove loose hair and distribute natural oils, leaving the coat shiny.
Grooming Glove: These are great for deshedding your short haired dog. The knobbles in the silicone of the glove help to gently pull away any loose hairs. These gloves can be used on wet or dry fur so are great for both every day grooms and after bath time.
Dog Grooming Tip: Brush your short-haired dog at least once or twice a week to catch loose hairs and keep their coat looking sleek.
Best Brush for Long-Haired Dogs
Long-haired breeds (such as Shih Tzus, Collies, and Afghan Hounds) can develop mats and tangles if not brushed regularly. The best brush for long haired dogs typically falls under two categories:
Pin Brush: Ideal for gently detangling without pulling on long hair.
Slicker Brush: Contains fine, short wires close together to remove loose fur and tackle minor knots.
A pin brush is often the first step in grooming a long-haired dog, followed by a slicker brush to tackle any remaining tangles. It’s important to brush daily or at least every other day to stay on top of mat formation.
Best Brush for Curly-Haired Dogs
Curly-haired breeds like Poodles, Labradoodles, and Bichon Frisés require a bit more care because their coats tend to tangle and mat quite easily. The best brush for curly haired dogs is usually a slicker brush with flexible pins, combined with a metal comb to ensure you reach every layer of their dense coat. Here’s why:
Slicker Brush: Helps remove loose hair and can break up small mats.
Metal Comb: Great for a final pass to catch any tangles the brush may have missed.
For curly-coated dogs, brushing daily or at least 3-4 times a week is recommended to keep their coats free from painful mats.
Best Brush for Wire-Haired Dogs
Wire-haired breeds like Schnauzers and Wire Fox Terriers have rough, bristly coats that need specialised care. The best brush for wire haired dogs often includes:
Slicker Brush: Ideal for removing loose hairs from the topcoat.
Undercoat Rake: If your dog has a dense undercoat, a rake can help remove dead hairs from the lower layers.
Stripping Knife (Optional): For some wire-haired breeds that require hand-stripping, like border terriers, this is a specialised tool groomers use to pluck out dead hairs, keeping the coat’s texture and colour vibrant.
Wire-haired coats need brushing 1-2 times a week if they don’t require regular stripping. If your breed does need stripping, it’s often done every few months or more frequently depending on breed standards.
Best Brush for Double-Coated Dogs
Double-coated breeds (German Shepherds, Golden Retrievers, Huskies) have a dense undercoat beneath a longer topcoat. This thick coat sheds seasonally and can be quite a handful! The best brush for double coated dogs is typically:
Undercoat Rake: Made specifically to reach the dense undercoat.
Slicker Brush or Pin Brush: Follows the rake to smooth the topcoat and remove remaining loose fur.
Aim to brush double-coated breeds at least twice a week, increasing frequency during heavy shedding seasons (often spring and fall).
Best Brush for Silky-Haired Dogs
Silky-coated breeds like Yorkies, Maltese, and Cocker Spaniels are known for their glossy, flowing locks. These dogs’ coats are prone to breakage, so selecting a gentle brush is essential. The best brush for silky haired dogs is often:
Pin Brush: Look for one with rounded tips to protect their skin and hair.
Slicker Brush (Soft Pins): Can be used carefully to work through any tangles.
A comb can also help in keeping silky coats free of knots, particularly around the ears and the base of the tail. Brush these dogs daily or at least every other day to maintain that show-stopping shine.
Best Brush for Puppies
Puppies have delicate coats and sensitive skin, so the best brush for puppies is usually one that’s gentle and comforting. Options include:
Soft Bristle Brush: Helps your puppy get used to the sensation of brushing without discomfort.
Rubber Grooming Glove: Offers a calming massage and helps remove loose fur.
Puppy grooming sessions should be short and positive, introducing the concept of brushing in a gradual manner. This sets them up for a lifetime of stress-free grooming.
How Often Should I Brush My Dog’s Hair?
“How often should I brush my dog’s hair?” is one of the most common questions dog owners ask. The frequency depends largely on your dog’s coat type and lifestyle:
Short-Haired Breeds: 1-2 times per week.
Long-Haired and Curly-Haired Breeds: At least every other day, often daily for thicker coats.
Wire-Haired and Double-Coated Breeds: 1-2 times weekly, more often during heavy shedding seasons.
Silky-Haired Breeds: Daily or every other day to avoid tangles.
Puppies: 2-3 times a week to familiarise them with the process without overwhelming them.
Keep in mind that if your dog frequently plays outside or has a tendency to pick up debris, you may need to increase your brushing schedule.
Best Brush for My Dog’s Coat Type Summary
Short-Haired Breeds: Grooming glove or a bristle brush
Long-Haired Breeds: Pin brush and a slicker brush
Curly-Haired Breeds: Slicker brush and a metal comb
Wire-Haired Breeds: Slicker brush, undercoat rake and stripping knife
Double-Coated Breeds: Undercoat rake, slicker brush and pin brush
Silky-Coated Breeds: Pin brush and a soft pinned slicker brush
Puppies: Soft bristle brush or rubber grooming glove
How to Get a Dog Used to Having Their Hair Brushed
Whether you’ve just adopted a rescue dog or you’re training a new puppy, the question of how to get a dog used to having their hair brushed is critical. Here are some helpful steps:
Start Slowly: Let your dog sniff the brush before you begin. Offer treats or gentle praise to create a positive association.
Short Sessions: Begin with brief brushing sessions—30 seconds to a minute—focusing on easy-to-reach areas like the back.
Reward Good Behaviour: Treats, praise, or playtime make grooming feel more like a reward than a chore.
Gradual Progress: Over time, slowly extend the brushing to sensitive areas like the belly, ears, and tail.
Positive Reinforcement: If your dog shows signs of anxiety, take a break and try again later, always ending on a positive note.
Final Thoughts & Where to Find Dog Brushes
Choosing the right brush is key to a pleasant, stress-free grooming routine. By understanding your dog’s coat type and following these dog grooming tips, you can keep their coat looking healthy and shiny while preventing uncomfortable mats and excess shedding.
Ready to give your furry friend the royal grooming treatment? Browse our full collection of dog brushes and combs here. You’ll find a variety of brush types to suit every coat, plus other grooming essentials to make bath time and brushing easier than ever.
With the right tools, a little patience, and some knowledge of your pup’s unique needs, you’ll soon have a happy, healthy dog that looks and feels fantastic every single day.
As our beloved feline companions grow older, their needs evolve. An old cat (often referred to as an aged cat or senior cat) requires extra attention to ensure they stay healthy, comfortable, and happy. Whether you’re just beginning your journey in looking after an old cat or you’ve been caring for one for years, it’s always beneficial to review the fundamentals of senior cat care. Below, we’ll walk you through essential tips, from nutrition and environment to health checks and emotional well-being, to help you provide the best ageing cat care for your cherished pet.
Recognising the Signs of Aging
Just like humans, cats often display physical and behavioural signs as they enter their golden years. Although the pace and extent of these changes vary from cat to cat, there are a few common indicators that your feline may be crossing into senior cat territory:
Reduced Mobility: Stiff joints, difficulty jumping to high perches, or reluctance to climb stairs can signal aging.
Altered Sleep Patterns: Senior cats might snooze more frequently, or sometimes experience restless nights.
Weight Changes: An old cat could lose or gain weight depending on their metabolism and activity levels.
Changes in Coat and Claws: You may notice a thinning coat or brittle claws as your cat ages.
Behavioural Shifts: Increased vocalisations at night, disorientation, or a change in grooming habits can all point to an aged cat needing additional support.Observing these signs is the first step in looking after an old cat.
Regularly discussing any new or concerning observations with your vet is crucial for appropriate guidance and timely intervention.
The Importance of a Senior Cat Diet
One of the key components of senior cat care is providing a nutritionally balanced, age-appropriate meal plan—often referred to as a senior cat diet. Older cats have distinct dietary needs, including higher-quality proteins to maintain muscle mass, along with specific vitamins and minerals that support joint health, kidney function, and overall well-being.
High-Quality Protein: Look for senior catfood that lists real meat (like turkey, chicken, or fish) as the primary ingredient. Cats are obligate carnivores, meaning they thrive on high-quality animal protein sources.
Reduced Calories: Many older cats become less active with age. A cat-specific diet with reduced calories can help them maintain a healthy body weight.
Joint and Immune Support: Some senior catfood formulas include added nutrients like glucosamine and chondroitin for joint health, as well as antioxidants for immune system support.
Easily Digestible Ingredients: As cats age, their digestive systems might become more sensitive. Foods that are gentle on the stomach can help prevent issues like vomiting or constipation.
One highly recommended option is PRO PLAN LiveClear Sterilised 7+ Senior Cat Dry Food with Turkey. Formulated especially for senior cats, it provides balanced nutrition with quality protein, essential vitamins, and targeted minerals. This helps support your aged cat’s mobility, immune function, and overall vitality, making it an excellent choice for a senior cat diet.
Setting Up a Comfortable Environment
An ageing cat may find it harder to jump, run, or climb, so modifying your home can go a long way in keeping them comfortable:
Soft, Warm Bedding: Provide plush, warm beds in accessible areas, preferably somewhere quiet. Our luxury cat beds make the perfect nap spot.
Easy Accessibility: If your cat loves gazing out of the window or snuggling on the sofa, consider adding ramps or pet steps to help them get there without straining.
Temperature Control: Older cats often feel the cold more than younger ones. Make sure your home has cosy spots away from drafts.
Quiet Zones: Senior cats appreciate a sense of calm. Ensure there’s a quiet corner where they can relax away from other pets or household bustle.
Common Health Concerns in Senior Cats
Part of ageing cat care involves understanding the common health challenges that may arise. Early detection and professional advice can save your cat from unnecessary discomfort:
Arthritis: This is one of the most prevalent issues in senior cats. Look out for limping, reluctance to jump, or difficulty using the litter tray.
Kidney Disease: As cats age, their kidneys may become less efficient. Signs include increased thirst, frequent urination, and weight loss.
Dental Issues: Tartar buildup, tooth decay, and gum disease can affect senior cats, potentially leading to pain and reduced appetite.
Hyperthyroidism: This condition can cause weight loss despite an increased appetite, hyperactivity, and a poor coat condition.
When to Worry About Vomiting
It’s not uncommon to see an elderly cat throwing up occasionally, as hairballs or slight digestive upsets can happen. However, if vomiting becomes frequent or is accompanied by lethargy, loss of appetite, or weight loss, it’s crucial to consult a vet. Chronic vomiting can sometimes indicate gastrointestinal issues, kidney problems, or other underlying diseases.
Grooming and Hygiene for Older Cats
Grooming remains an essential part of senior cat care. Since older cats might experience joint stiffness or other issues that make grooming difficult, they may need a bit of extra help:
Regular Brushing: Keep your cat’s coat free of tangles and mats, stimulate healthy blood flow, and reduce hairball formation. Treat them to a new cat brush here.
Check the Claws: Senior cats might scratch less or have difficulty shedding the outer layer of their claws. Regular nail trims prevent overgrowth, which can be painful. Learn how to trim your cat's nails here.
Gentle Assistance: Some older cats may develop greasy coats or dandruff because they can’t reach certain spots to groom. Use a soft brush or damp cloth to help them clean hard-to-reach areas.
Emotional Well-Being and Mental Stimulation
Beyond physical health, it’s equally important to nurture your cat’s emotional well-being. Senior cats can still enjoy playtime, mental challenges, and bonding time:
Interactive Play: Engage in short, gentle play sessions using feather wands or laser pointers. Adapt the activity to suit your cat’s energy level.
Puzzle Toys: Stimulate your cat’s mind with treat-dispensing or puzzle toys. These keep them mentally alert and reward them with a tasty morsel.
Quality Time: Spend quiet moments together, stroking or grooming your cat to reinforce your bond. Cats, even independent ones, value consistent human interaction.
Regular Vet Check-Ups
Routine veterinary visits are paramount when looking after an old cat. Senior cats benefit from semi-annual check-ups, allowing your vet to detect any budding health issues early. Discuss any changes in appetite, weight, or behaviour during these appointments. Your vet might recommend blood tests, dental exams, or nutritional adjustments to optimise your cat’s health.
Tips for Simplifying Day-to-Day Senior Cat Care
Stable Routine: Cats thrive on consistency. Sticking to a regular feeding and play schedule can reduce stress and help your cat feel secure.
Portion Control: Since older cats can be prone to weight gain or loss, measuring meals and monitoring intake is vital.
Hydration: Ensure a clean, fresh water source at all times. Some senior cats may enjoy water fountains, which encourage them to drink more.
Monitoring Litter Box Habits: Keep an eye out for changes in frequency or stool consistency, as these can be early indicators of health problems.
Final Thoughts on Caring for Your Ageing Feline Friend
Caring for a senior cat is both a responsibility and a privilege. By focusing on a tailored senior cat diet, maintaining a comfortable living environment, and keeping a close watch for changes in health or behaviour, you can ensure your aged cat thrives well into their golden years.
Above all, stay attuned to your cat’s needs. Whether it’s helping them groom, altering their play routine, or consulting a vet at the first sign of elderly cat throwing up, proactive care sets the foundation for a long, healthy life. Each old cat deserves every measure of comfort and attention we can offer, and with the right approach to senior cat care, you’ll provide the nurturing environment your feline companion needs to stay happy and content.
Pet separation anxiety is a behavioural issue where pets experience extreme stress when left alone or separated from their primary caregiver. While commonly associated with dogs, cats can also be prone to anxiety—so it’s something for all pet owners to be aware of. The reasons behind separation anxiety can vary: some animals have had traumatic pasts, others may have grown overly dependent on constant company, and some simply have a more nervous disposition.
Why It Happens
Change in Routine: A sudden shift—such as a new job requiring more hours away—can trigger anxiety in dogs or cats who are used to having you around.
Past Trauma: Pets that have experienced abandonment or rehoming are at higher risk for separation-related issues.
Lack of Socialisation: Animals not used to being left alone from a young age may struggle to cope when solitude becomes necessary.
Recognising Separation Anxiety in Dogs
When it comes to separation anxiety in dogs, symptoms often manifest within minutes of your departure. Paying attention to these indicators helps you catch any anxiety early, ensuring you can take steps to manage your dog’s stress before it escalates.
Common Symptoms of Anxiety in Dogs
Excessive Barking or Whining: If your dog regularly barks or whines as soon as you leave—or even when you’re just getting ready to go—that may be a clear sign of anxiety.
Destructive Behaviour: Dogs with separation anxiety might chew furniture, rip up cushions, or claw at doors. This is often an outlet for pent-up stress.
Pacing and Restlessness: Keep an eye out for constant pacing near doors or windows. Restless behaviour can indicate your pup is on edge.
Urinating or Defecating Indoors: Accidents can happen for medical reasons, but if it only happens when you leave, it may stem from anxiety.
Escaping Attempts: Some dogs will try to escape confinement by digging or scratching at doors or crates, which can lead to injury if left unchecked.
If any of these anxiety in dogs symptoms sound familiar, it’s a good idea to consult with your vet to rule out any medical causes. Once you know it’s separation anxiety, there are strategies and products to help them cope.
Want to know more about how to support a dog with anxiety? Our Pet Experts have covered it in this handy guide, they’ve put together all their tips and tricks so you can best support your anxious pup.
Spotting Cat Separation Anxiety
Cat separation anxiety can be more subtle than what we typically see in dogs, but it’s no less real. Cats are often portrayed as independent creatures, but many develop strong bonds with their owners and can become distressed when left alone.
Signs of Separation Anxiety in Cats
Excessive Meowing or Yowling: A typically quiet cat might become noticeably vocal when you’re about to head out—or while you’re gone.
Over-Grooming: Cats with anxiety may lick or groom themselves excessively, sometimes leading to bald patches.
Litter Box Issues: Much like dogs, cats might begin “going” outside the litter box if they’re stressed about you leaving.
Clinginess: Some anxious cats follow their owners from room to room, showing signs of distress if they can’t see you.
Hiding or Withdrawal: On the flip side, anxious cats might retreat and hide for long periods, seemingly avoiding interaction to cope with stress.
If these signs of separation anxiety in cats resonate with you, don’t worry—there are plenty of ways to help ease your cat’s mind. Creating a calm environment and providing engaging toys or scratchers can help your feline friend feel more secure while you’re away.
What About Kitten Separation Anxiety?
Kittens are at a formative stage in their life, and kitten separation anxiety can set the tone for how they cope with alone time as adults. If a kitten becomes overly dependent on constant human contact, they may struggle to adapt when left by themselves.
Ensuring your kitten gradually experiences short periods of alone time can help them develop healthy independence. Combine this with plenty of interactive toys and comforting bedding to offer them both mental and physical stimulation.
How to Help Pets with Anxiety
Managing pets with anxiety is all about creating a calm environment and gradually helping them realise that being alone is not something to fear. Here are some tried-and-true methods:
Establish a Routine: Pets thrive on consistency. Try to feed them, walk them, and interact with them at roughly the same times each day.
Positive Departures and Arrivals: Keep greetings low-key. Making a big fuss when you leave or come back can reinforce anxious behaviour. Instead, try leaving and returning calmly, with minimal fanfare.
Safe, Cosy Spaces: Whether you have a dog or a cat, providing a comfortable “den” area—like a crate for dogs or a cat tree with a quiet hideaway spot for cats—can be extremely reassuring. For dog owners, we offer a range of calming anti-anxiety faux fur dog beds at Lords & Labradors that give pups a sense of security. The ultra-soft faux fur and supportive design can make a world of difference for an anxious dog.
Interactive Toys and Puzzles: Give your pets something to focus on while you’re away. Puzzle feeders, treat dispensers, or scratching posts can keep them mentally engaged and distract them from your absence. For dogs we love the Nina Ottosson range of interactive toys, they keep our pups busy for ages! And for cats we love the Catit Senses circuits, they're great for stimulating your feline's mind.
Scent Familiarity: Leave an item of clothing you’ve worn in their bed or safe space so they can find comfort in your familiar scent while you’re gone.
Consider Calming Aids: Talk to your vet about whether calming supplements or pheromone diffusers could help reduce anxiety levels. We stock a range of pheromone diffusers here at Lords & Labradors, they work by replicating the pheromones that your dog or cat’s mum would have given off when they were puppies and kittens so can really help to put your pet at ease.
Gradual Desensitisation: If your pet becomes anxious when they notice “departure cues” (like picking up keys or putting on shoes), try exposing them to these cues without leaving. Pick up your keys, then set them back down—repeat until it’s no longer a trigger.
Building Confidence in Your Pet
Fostering independence is crucial for pets with anxiety. Gradually increase the amount of time they spend alone. Start with just a few minutes—perhaps while you take out the rubbish—and slowly build up to longer periods. Praise and reward your pet’s calm behaviour when you return. Over time, they’ll learn that being alone isn’t something to worry about.
Our Must-Haves For Pet Separation Anxiety
Calming Anti-Anxiety Faux Fur Dog Beds: Our calming anti-anxiety faux fur dog beds are soft yet durable, perfect for making alone time feel safe and restful. Available in all of our best selling bed shapes there's sure to be a bed which meets your pet's needs!
Pet Remedy Calming Collection: These diffusers and sprays are natural way of tackling stress and anxiety in cats and dogs, Pet Remedy calming spray and plug-ins work alongside the brain’s natural messengers called neuro-transmitters, which work by telling the nerve receiving the message either to calm or get ‘fired up’. In times of stress or anxiety the nerves get over stimulated, which leads on to the many different signs of stress we see in our pets. The special Pet Remedy blend of essential oils works alongside these natural relaxation pathways to help calm the nerves of anxious or stressed pets without the need for sedation.
When to Seek Professional Help
If you’ve tried introducing routines, calming products, and training techniques but still notice persistent pet separation anxiety, it’s time to talk to a professional. Vets, certified animal behaviourists, or qualified dog trainers can provide tailored advice and interventions. In some cases, medication might be recommended, but this is typically considered after other strategies have been tried.
Final Thoughts
Pet separation anxiety can feel overwhelming, but rest assured there are plenty of ways to help your furry companions feel more comfortable during alone time. By understanding what anxiety in dogs and cat separation anxiety look like—and using supportive strategies like routine, safe spaces, and comforting products—you’ll be well on your way to improving your pet’s well-being. Remember: spotting anxiety in dogs symptoms or the signs of separation anxiety in cats is the first step. From there, consistent effort, patience, and a dash of creativity can make a world of difference.
If you need extra support, don’t hesitate to consult a professional. And if you’re looking for products to make your pet’s downtime more soothing, explore our Calming Anti-Anxiety Collection to keep your pet feeling secure and pampered. After all, a calm and confident pet is a happy companion—no matter how long you’re out and about!
We hope this guide has given you a better understanding of how to spot separation anxiety in your pets and what you can do to help them relax.
If you’re a dog owner, you know that our four-legged friends are more than just pets; they’re cherished members of the family. Just like any family member, our dogs can encounter cuts, scrapes, bites, or even more serious emergencies that require immediate attention. Having a solid grasp of dog first aid can make all the difference in helping your dog recover quickly and comfortably. In this guide, we’ll explore essential tips to help you stay prepared. We’ll also look at why having a dog first aid kit is a must for every responsible dog owner.
Why You Need a Dog First Aid Kit
A well-stocked dog first aid kit is the first step toward being fully prepared for emergencies. Having everything in one place allows you to respond quickly when accidents happen—whether it’s a small cut or something more serious like choking. Many injuries can be managed effectively at home if you have the right tools and knowledge, but even when professional vet care is needed, administering immediate first aid can help stabilise your pet’s condition.
Recommended Dog First Aid Kit
When putting together a pet first aid kit for dogs, it’s easy to get overwhelmed. That’s why we recommend choosing a comprehensive kit like the Charlie the Vet Pet First Aid Kit, available at Lords & Labradors. It’s designed by experts to include all the basics you need to tackle everyday emergencies, from bandages to antiseptic wipes.
Key Items in a Dog Medicine Kit
It’s not just about having a kit; it’s about having the right items in it. While every dog’s needs can differ, here are a few universally recommended staples:
Bandages and Dressings – For covering wounds and stopping bleeding.
Antiseptic Solution or Wipes – For cleaning and disinfecting minor cuts and scrapes.
Tweezers or Forceps – Helpful for removing splinters, ticks, or small foreign objects.
Gauze Pads and Rolls – Ideal for dressing larger wounds.
Adhesive Tape – To secure bandages in place, ensuring they don’t shift.
Disposable Gloves – To keep the area sterile and protect yourself while administering first aid.
Scissors – Blunt-ended scissors can help you cut bandages or remove hair around a wound safely.
Digital Thermometer – So you can accurately measure your dog’s temperature.
Emergency Contact Numbers – Keep your vet’s number, along with any emergency helpline numbers, handy in your kit.
Additionally, if your dog has pre-existing conditions, consult your vet about including any special medication in your dog medicine kit.
How to Handle Common Canine Emergencies
Dogbite First Aid
A dog bite can vary from a minor nip to a serious wound. If your dog has been bitten—or if your dog bites another dog—the steps for immediate dogbite first aid are similar:
Stay Calm – Approach the situation with a clear head. Panicking will only stress your dog more.
Assess the Wound – Look for puncture marks, bleeding, or swelling.
Stop the Bleeding – Use a clean cloth or gauze to apply gentle pressure if there’s active bleeding.
Clean the Area – Gently wash the wound with mild soap and water, then apply an antiseptic solution.
Apply a Sterile Dressing – Cover the wound with a clean dressing from your pet first aid kit for dogs.
Seek Veterinary Advice – Even minor wounds can become infected, so it’s always wise to consult a vet after a bite incident.
Choking Dog First Aid
Choking in dogs can happen unexpectedly—dogs are curious creatures and might swallow inappropriate items. Knowing the basics of choking dog first aid can save your pet’s life:
Look for Signs – Gagging, difficulty breathing, or pawing at the mouth can indicate choking.
Check the Mouth – Carefully open your dog’s mouth to see if the object is visible. Use tweezers from your dog med kit to remove it if you can see it clearly.
Perform the Heimlich Manoeuvre (If Necessary) – For smaller dogs, hold them with their back against your chest and apply gentle yet firm pressure just below their ribcage. For bigger dogs, place your arms around the dog’s waist (while they stand) and give a quick, upward thrust.
Vet Check – Even if you manage to remove the obstruction, a follow-up exam is a good idea to ensure no harm was done to the airway.
Dog CPR: Life-Saving Techniques
In extreme cases—like severe accidents or near-drownings—you might need to perform dog cpr. This is a critical skill every dog owner should understand. Knowing how to do cpr on a puppy is particularly important because puppies are more vulnerable and can deteriorate quickly. It’s definitely worth looking if there are any pet first aid courses in your area or if your vet can help teach you this critical skill.
Preventing Emergencies
While knowing basic dog first aid is crucial, prevention is always better than cure. Here are a few tips to keep your dog safe and healthy:
Supervise Playtime – This helps you prevent your dog from chewing or swallowing hazardous objects.
Keep Toxic Substances Out of Reach – Household cleaners, certain plants, and human foods like chocolate or grapes can be dangerous if ingested.
Maintain a Nutritious Diet – A well-balanced diet promotes a stronger immune system and overall health.
Stay Up to Date on Vaccinations – Reducing the risk of infectious diseases will help limit the need for emergency treatments.
Grooming and Regular Check-ups – This helps you catch any unusual lumps, bumps, or cuts early on.
Conclusion
Whether you’re a novice dog owner or an experienced handler, understanding the basics of dog first aid can make all the difference in an emergency. From assembling a reliable dog first aid kit—like the Charlie the Vet Pet First Aid Kit—to mastering techniques such as choking dog first aid or cpr on a puppy, being prepared and knowledgeable is the best way to protect your furry friend. Quick responses not only help your dog physically but also provide peace of mind, knowing you’ve done everything possible for your beloved companion.
As always, remember that first aid is not a substitute for professional veterinary care. If you have concerns about your dog’s health, or if the situation appears severe, don’t hesitate to contact your vet right away. In the meantime, having a dog med kit on hand and the know-how to use it ensures you’re ready to help at a moment’s notice.Stay safe, stay prepared, and always keep your pet first aid kit for dogs within arm’s reach. After all, our dogs offer us unconditional love—being prepared to help them in an emergency is the least we can do.