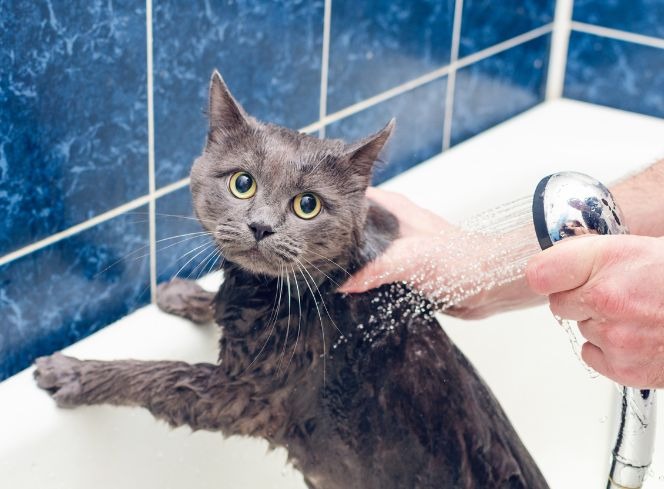
A well-known fact about cats is how clean they are, as they clean themselves regularly. You may never have thought about bathing your cat, but it’s sometimes necessary to give them a little help and bathe them yourself. If your cat is covered in something sticky, smelly or if they have picked something up, it’s best to give them a bath and keep them clean. Here are our tips to keep your feline looking, feeling and smelling fresh.
How To Wash A Cat
Start With Your Cats Claws
Their form of defence is their claws, so it’s best to focus on these before you put your cat straight into a stream of water. Keep the atmosphere calm and focused so you can trim your cats claws appropriately. We recommend using specific cat nail clippers to cut your cats nails with. If you're wanting to know the best way to cut your cats claws why not check out our blog on how to trim your cat's claws?
Brush Them First
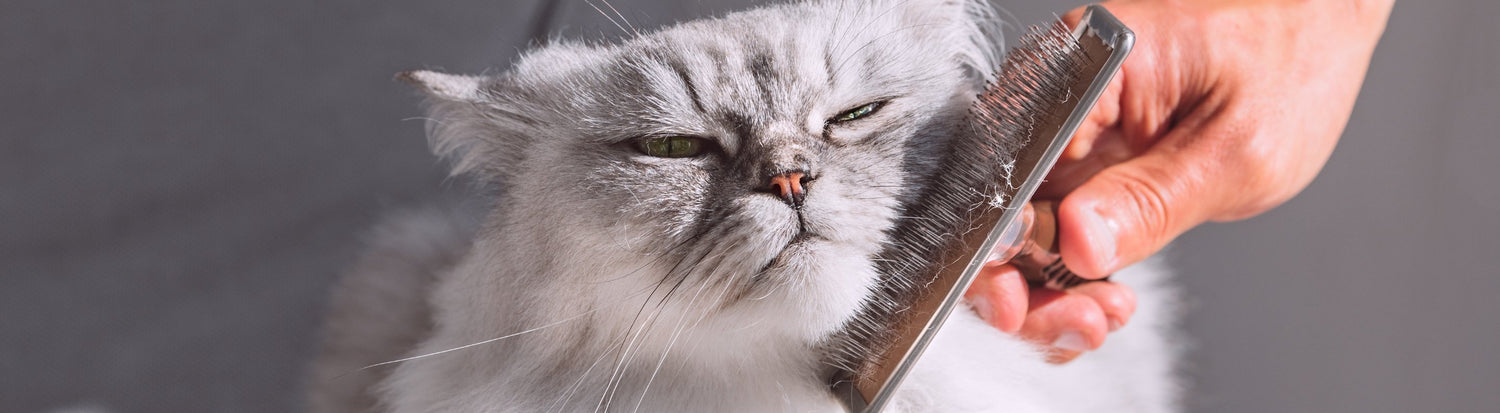
Once you’re happy with your cats claws, give your cat a brush over, removing any excess hair sitting in your cats coat. Cats shed all year round, so getting the excess hair from them will ensure for a more efficient bath time.
Introducing The Bath
Generally your cat won’t enjoy the bathing process and won’t be willing if they’re hungry or tired. So, try to time the grooming just right in their day, so they’ll be more comfortable throughout. You may want to play with them beforehand, or even offer them some catnip.
Bathing
If you don’t have a rubber bathmat, fold a towel and place it on the bottom of the bath so your cat has something sturdy to stand on. Fill the bath with a couple of inches of lukewarm water and place your cat in the water. You may need a second pair of hands to help with washing.
Shampooing
Do not use human shampoo on your cats fur, use a specially designed cat shampoo to avoid any unnecessary trips to the vet. Start at your cats neck and work your way over their body to finish with the shampooing of their tail. It’s unlikely your cat will go under the water, so use a jug to pour clean water over them to rinse out all of the shampoo.
Washing Their Face
We don’t recommend pouring water over your cats face and ears, instead, use a clean damp cloth to wipe over their face to clean.
Drying
Dry your cat fully and brush through if your cat needs it. Our Drying Mitts are great for lifting your cat out of the bath and drying them straight away.
Finally, don’t forget to finish with a really tasty, high reward treat. Treats and praise will make the while process more enjoyable for your cat, and they may let you bathe them again!
A well-known fact about cats is how clean they are, as they clean themselves regularly. You may never have thought about bathing your cat, but it’s sometimes necessary to give them a little help and bathe them yourself. If your cat is covered in something sticky, smelly or if they have picked something up, it’s best to give them a bath and keep them clean. Here are our tips to keep your feline looking, feeling and smelling fresh.
How To Wash A Cat
Start With Your Cats Claws
Their form of defence is their claws, so it’s best to focus on these before you put your cat straight into a stream of water. Keep the atmosphere calm and focused so you can trim your cats claws appropriately. We recommend using specific cat nail clippers to cut your cats nails with. If you're wanting to know the best way to cut your cats claws why not check out our blog on how to trim your cat's claws?
Brush Them First
Once you’re happy with your cats claws, give your cat a brush over, removing any excess hair sitting in your cats coat. Cats shed all year round, so getting the excess hair from them will ensure for a more efficient bath time.
Introducing The Bath
Generally your cat won’t enjoy the bathing process and won’t be willing if they’re hungry or tired. So, try to time the grooming just right in their day, so they’ll be more comfortable throughout. You may want to play with them beforehand, or even offer them some catnip.
Bathing
If you don’t have a rubber bathmat, fold a towel and place it on the bottom of the bath so your cat has something sturdy to stand on. Fill the bath with a couple of inches of lukewarm water and place your cat in the water. You may need a second pair of hands to help with washing.
Shampooing
Do not use human shampoo on your cats fur, use a specially designed cat shampoo to avoid any unnecessary trips to the vet. Start at your cats neck and work your way over their body to finish with the shampooing of their tail. It’s unlikely your cat will go under the water, so use a jug to pour clean water over them to rinse out all of the shampoo.
Washing Their Face
We don’t recommend pouring water over your cats face and ears, instead, use a clean damp cloth to wipe over their face to clean.
Drying
Dry your cat fully and brush through if your cat needs it. Our Drying Mitts are great for lifting your cat out of the bath and drying them straight away.
Finally, don’t forget to finish with a really tasty, high reward treat. Treats and praise will make the while process more enjoyable for your cat, and they may let you bathe them again!
SIGN UP FOR USEFUL TIPS & GUIDES STRAIGHT TO YOUR INBOX
When it comes to giving our dogs the very best in comfort and care, their bed is one of the most important investments we can make. While any soft cushion might seem like enough, for certain dogs, especially seniors or breeds prone to joint issues an orthopaedic dog bed can make a world of difference. But are they really worth it? Let’s explore the benefits, the dogs who need them most, and what to look for in the best dog bed for arthritis and joint support.
What Is an Orthopaedic Dog Bed?
An orthopaedic dog bed is designed with supportive materials such as memory foam or high-density foam, which contour to your dog’s body. Unlike traditional beds, these don’t simply flatten under pressure. Instead, they distribute your dog’s weight evenly, reducing strain on sensitive joints, hips, and muscles.
For dogs with arthritis, hip dysplasia, or recovering from surgery, this type of support can be invaluable. But many younger and active dogs benefit too, as it helps prevent wear and tear over time.
Benefits of Orthopaedic Dog Beds
Pain Relief for Senior Dogs - As dogs age, their joints naturally become stiffer. Arthritis is particularly common in older dogs, and getting up and down from hard or unsupportive surfaces can become uncomfortable. An orthopaedic dog bed cushions their joints, making resting and rising easier.
Support for Breeds Prone to Joint Problems - Certain breeds are genetically more likely to develop joint issues. Large dogs such as Labradors, German Shepherds, and Golden Retrievers are especially prone to hip dysplasia and arthritis. For these breeds, an orthopaedic dog bed isn’t just a luxury, it’s a proactive step to support their health.
Improved Sleep Quality - Just like humans, dogs need deep, restorative sleep. When their body is properly supported, they are less likely to toss and turn. A well-rested dog is a happier, healthier dog.
Prevention of Pressure Sores - Dogs that lie for long periods whether due to age, illness, or limited mobility, can develop pressure sores on hard surfaces. Orthopaedic foam reduces this risk by spreading weight evenly and minimising pressure points.
Long-Term Investment - Although an orthopaedic dog bed is usually more expensive than a standard cushion, its durability and health benefits make it a cost-effective choice. Quality foam won’t sag or flatten quickly, meaning you won’t need to replace it as often.
Orthopaedic vs. Standard Dog Beds: What’s the Difference?
To help decide whether an orthopaedic dog bed is worth the investment, here’s a side-by-side look:
Feature
Standard Dog Bed
Orthopaedic Dog Bed
Filling
Polyester stuffing, fibre, or basic foam
Memory foam or high-density foam layers
Support
Can flatten over time, offering uneven support
Even weight distribution, contours to body
Joint Care
Minimal – may aggravate arthritis or joint pain
Reduces pressure on joints, ideal for arthritis
Durability
May lose shape quickly
Designed to last longer without sagging
Price
Lower initial cost
Higher cost but long-term value
Best For
Young, healthy dogs with no mobility issues
Senior dogs, large breeds, or those with arthritis
This comparison shows that while standard beds are suitable for many younger, healthy dogs, orthopaedic beds are the clear winner when it comes to comfort, joint care, and longevity.
What Materials Are Used in Orthopaedic Dog Beds?
The best orthopaedic dog beds are made from memory foam, which adapts to your dog’s shape and returns to its original form after use. High-density foam layers are often combined with memory foam to provide extra firmness and stability.
Other features to look for include:
Removable, washable covers – essential for hygiene.
Water-resistant liners – to protect against accidents or spills.
Raised edges or bolsters – perfect for dogs who like to rest their heads while still supporting their joints.
Is an Orthopaedic Dog Bed Worth It?
For dogs with arthritis, joint problems, or in their golden years, the answer is almost always yes. These beds can significantly improve comfort and quality of life, helping your dog stay mobile and pain-free for longer.
Even if your dog is still young and sprightly, investing in a supportive bed now can help protect their joints as they age. Think of it as preventative care, just as you’d choose a supportive mattress for yourself.
Choosing the Best Dog Bed for Arthritis
When shopping for the best dog bed for arthritis, consider the following:
Size: Ensure your dog can stretch out fully without hanging off the edges.
Thickness: The thicker the foam, the better the support—ideally at least 4 inches.
Ease of cleaning: Removable covers make life much easier.
Design: Flat beds are best for dogs with severe mobility issues, while bolstered beds suit those who like extra head support.
At Lords & Labradors, we offer a range of orthopaedic dog beds crafted with comfort, support, and style in mind, so you don’t have to compromise between practicality and luxury.
Overall…
An orthopaedic dog bed is more than just a comfy place for your pet to snooze. For senior dogs, those with arthritis, and breeds prone to joint problems, it’s a vital part of their care. The right bed can ease pain, improve sleep quality, and protect long-term joint health, making it a truly worthwhile investment.
If you’re ready to give your dog the restful sleep they deserve, explore our collection of orthopaedic dog beds at Lords & Labradors, where comfort and quality go paw in paw.
As a loving cat owner, ensuring your feline friend's safety extends beyond just food and care. One crucial aspect often overlooked is the presence of plants and flowers in your home and garden. Many common plants are toxic to cats, and ingestion can lead to severe health issues or even be fatal. In this comprehensive guide, we’ll explore which plants are poisonous to cats, helping you create a safe environment for your beloved pet.
Understanding the danger of plants to cats
Cats are naturally curious creatures, and their instinct to nibble on plants can put them at risk. While some plants cause mild irritation, others can lead to significant health complications. Being informed about these hazardous plants is the first step in protecting your cat.
Common Indoor Plants that are Poisonous to Cats
Indoor plants can add beauty and freshness to your home, but many are not safe for cats. Here are some common indoor plants that are toxic to cats:
Lilies (Lilium species) - All parts of lilies, including the leaves, petals, pollen, and even water from the vase, are extremely toxic to cats. Ingestion can cause severe kidney failure.
Aloe Vera - While beneficial for humans, aloe vera contains saponins and anthraquinones that can cause vomiting, diarrhoea, and lethargy in cats.
Philodendron - This popular houseplant contains calcium oxalate crystals, which can irritate a cat’s mouth, throat, and stomach.
Pothos (Devil’s Ivy) - Another common houseplant, pothos, can cause oral irritation, vomiting, and difficulty swallowing.
Outdoor Plants and Flowers Dangerous to Cats
Outdoor plants can also pose a threat. Here are some that should be kept away from your feline friend:
Azaleas and Rhododendrons - These flowering shrubs contain grayanotoxins, which can lead to vomiting, diarrhoea, and drooling,
Daffodils - The whole of the daffodil is toxic to your cat, however, the bulbs of daffodils are especially dangerous, causing severe vomiting, diarrhoea, abdominal pain, and potential heart issues.
Sago Palm - All parts of the sago palm are toxic, with the seeds being the most potent. Ingestion can result in liver failure and death.
Oleander - This plant is highly toxic and can cause severe cardiac issues, vomiting, and death.
Lesser-Known Toxic Plants for Cats
Some plants are not as commonly known to be toxic but can still pose significant risks:
Chrysanthemums - These flowers contain pyrethrins which can cause gastrointestinal upset and loss of coordination.
Cyclamen - The tubers of cyclamen are especially toxic, causing severe gastrointestinal distress and potential heart problems.
Kalanchoe - This plant can cause vomiting, diarrhoea, and in severe cases, abnormal heart rhythms.
Creating a Safe Environment for your cat
To ensure your home and garden are safe for your cat, consider the following tips:
Identify and Remove Hazardous Plants - Go through your home and garden to identify any plants that are toxic to cats and remove them or place them out of reach.
Opt for Cat-Safe Plants - Choose plants that are non-toxic to cats, such as spider plants, bamboo, and cat grass, which are safe and even enjoyable for your feline friend.
Educate Household Members and Visitors - Ensure everyone in the household is aware of the dangers certain plants pose to cats. Guests should also be mindful if they bring flowers or plants into your home.
Use Plant Deterrents - If removing the plant is not an option, consider using deterrents like citrus sprays, which can discourage cats from chewing on plants.
What to Do If Your Cat Ingests a Toxic Plant
If you suspect your cat has ingested a toxic plant, it's crucial to act quickly:
Identify the Plant - If possible, identify the plant your cat has ingested to provide accurate information to your vet.
Contact Your Vet Immediately - Call your vet right away. Provide details about the plant and any symptoms your cat is exhibiting.
Observe and Follow Professional Advice - Monitor your cat closely and follow any instructions given by the veterinarian. Symptoms of plant poisoning can vary widely and may include vomiting, diarrhoea, lethargy, and more severe signs like seizures or difficulty breathing.
Conclusion
By being aware of which plants are poisonous to cats and taking proactive steps to prevent exposure, you can help ensure your cat lives a healthy and safe life. Always keep a list of toxic plants handy and regularly check your home and garden for any hazardous plants. Your cat’s health and safety are worth the effort.
Here at Lords & Labradors we are a luxury online pet department store, we have spent lots of time carefully designed, curating and hand-selecting all the best products for your cat - shop here.
Your Puppy’s First Vet Visit: Everything You Need to Know and Bring
Bringing home a new puppy is a joyful experience full of cuddles, playful tumbles, and plenty of learning opportunities. One of the most important early steps in ensuring a long, healthy life for your little furry friend is scheduling that very first vet appointment.
Here, we will walk you through everything you need to know—from choosing the right vet to packing essential items—so you can confidently make your puppy’s debut clinic visit a positive, stress-free experience.
When to Schedule the First Vet Visit
Making a timely vet appointment is crucial to kickstart your puppy’s healthcare routine. Most puppies should visit a vet within the first week or two of arriving home, particularly if you have limited information about their vaccination or medical history.
This ensures:
A thorough health check
A clear vaccination schedule
Early detection of any existing health concerns
A chance to address fleas, worms, or other parasites right away
Even if your breeder or rescue provided initial records, scheduling a vet consult soon after you bring your puppy home guarantees you stay on track with recommended treatments and helps your new pup settle confidently into their forever home.
Choosing the Right Veterinary Practice
Finding the right vet is about more than simply picking the nearest clinic. You’ll want a team that resonates with your approach to pet care, offers comprehensive services, and is conveniently located. Here are a few considerations:
1. Recommendations and Reviews
Ask friends, family, or local pet communities about their experiences.
Research online reviews to see what other pet owners say about the clinic’s staff and services.
2. Location and Accessibility
Close proximity to your home can be crucial during emergencies or for regular checkups.
Check if the clinic has easy parking or access to public transport.
3. Clinic Environment
Does the clinic have separate waiting areas for dogs and cats?
Is the staff friendly and accommodating when you phone or visit?
4. Additional Services
Some practices also offer grooming, training, or boarding—bonus points if you’d like one-stop convenience.
We recommend asking plenty of questions beforehand. A good vet will welcome your curiosity and ensure you feel well informed about their protocols and expertise.
Preparing Your Puppy for the Vet
Your puppy’s first vet visit can be a big event, and the best way to ensure it goes smoothly is by acclimating them beforehand. Our team of pet experts suggests the following to help set your puppy up for success:
Practice Being Handled
Gently handle your puppy’s paws, ears, and mouth at home to build their comfort with touch.
Get them used to being lifted onto low tables or countertops (safely) so the vet’s exam table won’t feel too foreign.
Desensitise Through Short Trips
Take quick car rides or walk your puppy past the vet clinic so they can experience these environments without any medical procedures involved.
Reward them with treats and praise during these “practice runs” to create positive associations.
Positive Reinforcement
Reinforce calm behaviour with gentle praise and occasional treats.
If your puppy seems anxious, remain calm and reassuring—your demeanour sets the tone for how they interpret new situations.
What to Bring on Vet Day
Being well-prepared helps make the experience smooth for both you and your pup. A few essentials include:
Medical Records or Documentation - Bring any paperwork from breeders, rescues, or previous owners detailing vaccines and treatments.
Comfortable Carrier or Bed - Our Easy Traveller Bed is perfect for a cosy, secure ride. It’s designed to help your puppy feel snug and calm on the go.
Treats and Toys - Small, tasty treats will help with positive reinforcement, while a familiar toy can offer comfort in unfamiliar surroundings. Stock up on tasty training treats here
Lead and Harness - Always secure your puppy, even if you have a carrier. This ensures you can safely guide them around the waiting area.
Stool Sample (If Requested) - Check if your vet wants a fresh sample for parasite testing. If so, collect it just before the appointment.
Travelling to the Vet
Safety First
Secure your puppy in a travel crate, carrier, or on a harness fastened in the car. This prevents distractions and keeps them safe during the journey.
A bed like the Easy Traveller Bed can be buckled in or placed in a stable spot so your pup feels at ease.
Short Familiarisation Drives
If your puppy is new to car rides, start with short, fun trips around the block or to a local park.
Gradually increase the distance and reward calm behaviour along the way.
Keep the Atmosphere Calm
Use a soft tone of voice and, if possible, a quiet environment in the car (lower radio volume, for instance).
Avoid sudden stops or erratic driving—gentle, steady driving helps your puppy remain relaxed.
Handling the Waiting Room
Vet waiting rooms can be bustling places, filled with unfamiliar scents and animals. Here’s how to keep the experience positive:
Stay Close - Keep your puppy on a short lead or in their carrier to prevent unwanted interactions with other pets. If they haven’t been vaccinated yet we’d recommend keeping them in their carrier or sat on your lap to minimise infection risk.
Pick a Calm Spot - Some clinics separate dogs and cats—choose the dog-friendly side if it’s less hectic.
Offer Comfort - Speak reassuringly, stroke your puppy gently, and provide a treat for good behaviour.
What to Expect During the Exam
Once called in, the vet will likely perform a thorough check to assess your puppy’s overall health. This involves examining the ears, eyes, nose, mouth, heart, and lungs. Making your pup feel comfortable on the exam table is crucial:
Place a familiar toy or blanket on the table to ease any nerves. A lot vets will also provide your puppy with treats during the exam to help reassure them and build trust
Stay relaxed and speak soothingly; puppies pick up on your energy.
Reward calm behaviour with gentle praise—or a small treat if the vet allows.
Key Procedures at the First Vet Visit
Your puppy’s inaugural appointment often covers a few foundational treatments and discussions:
Physical Examination - A nose-to-tail check ensures your puppy has no underlying medical issues that need attention.
Vaccinations - Puppies typically start their core vaccinations around 6–8 weeks old, with boosters scheduled in the following weeks or months. Your vet will clarify the exact timeline.
Microchipping - If your puppy isn’t already chipped, the vet can usually do it on site. This quick, relatively painless procedure provides your pet with permanent identification.
Flea & Worm Prevention - Young puppies can be prone to parasites. Your vet will recommend treatments to guard against fleas, ticks, and worms, and outline an ongoing preventative routine.
Nutritional & Behavioural Advice - Vets can guide you on puppy-appropriate foods, treats, and basic training tips. Don’t hesitate to ask questions!
Essential Tips in a Nutshell
Book Early: Schedule a vet appointment soon after bringing your puppy home.
Practice Handling: Get them used to gentle touches and being lifted.
Travel Prep: Use a comfortable, secure carrier or bed like our Easy Traveller Bed.
Waiting Room Strategy: Keep them on a lead or in a carrier, choose a quiet corner, and reassure them with a calm voice.
Follow Vet Guidance: Stick to the recommended vaccination, microchipping, and parasite prevention schedules.
Final Thoughts
Your puppy’s first vet visit lays the groundwork for a lifetime of good health. By choosing a reputable veterinarian, preparing your pup with gentle handling, and bringing the right essentials—from carriers to treats—you can make this inaugural trip a positive milestone rather than a stressful one. We at Lords & Labradors believe every puppy deserves a great start in life, and our team of pet experts are always here to support you with advice, products, and resources.
Remember, the better the experience at this early stage, the more likely your puppy will feel comfortable during future checkups. A little preparation today goes a long way toward ensuring a lifetime of wagging tails and happy vet visits in the years to come!
Shop all the puppy essentials you will need for your pups first vet visit and beyond at Lords & Labradors.
A Step-by-Step Guide to Switching Your Pet’s Food: Tips for Both Dogs and Cats
Transitioning pet food can feel daunting, especially if you’re unsure how your furry companion will react to the change. Whether you need to switch dog food to address specific dietary needs or try a new cat food formula for your feline’s sensitive stomach, a smooth food transition can help prevent tummy troubles and ensure your pet maintains optimal health. In this step-by-step guide, we’ll walk you through everything you need to know about changing your pet’s diet—from the reasons behind a healthy pet food transition to practical tips on avoiding digestive issues in pets. Let’s dive in!
Why Consider Changing Your Pet’s Diet?
There are several reasons why you might consider transitioning pet food for your dog or cat:
Age and Life Stage: Puppies and kittens have different nutritional requirements than adult or senior pets. As your pet grows, switching to an age-appropriate formula can support their changing needs.
Health Concerns: Some pets develop allergies, intolerances, or medical conditions (like kidney disease or obesity) that require specialised diets. How to switch dog food without stomach upset is a common concern here, especially if you’re moving to a prescription diet.
Picky Eaters: Some dogs and cats become bored with their current food, or they might simply prefer a different flavour or texture.
Quality of Ingredients: You may decide to switch to a higher-quality or more natural ingredient list for better long-term health outcomes.
Regardless of your motivation for a gradual diet change for pets, it’s important to do so carefully to keep your pet comfortable and healthy.
Step-by-Step Pet Food Transition
A step-by-step pet food transition typically takes about 7-10 days, but it can be extended if your pet has a sensitive stomach. Below is a general guide for both dogs and cats:
Step 1: Consult Your Vet
Before making any dietary adjustments, have a quick chat with your vet. They can help you choose the best formula based on your pet’s age, weight, and health status. This is especially important if you’re wondering about a step-by-step cat food transition for sensitive stomachs or dealing with a dog who has chronic digestive issues.
Step 2: Gather Your Supplies
Stock up on enough of your pet’s old food so you can mix it with the new pet food gradually. It’s also handy to have measuring cups or a kitchen scale to ensure consistent portion sizes.
Step 3: Start With a Small Percentage of New Food
For the first two to three days, mix about 25% of the new food with 75% of the old food. This ratio helps your pet get used to the new taste and texture without overwhelming their digestive system.
Example: If your dog eats one cup of food per meal, use ¾ cup old food and ¼ cup new food. The same principle applies to cats—simply adjust the measurements to your cat’s usual serving size.
Step 4: Increase the Ratio of New Food Gradually
Over the next few days, adjust the ratio to 50% old food, 50% new food, and then to 25% old food, 75% new food by days 5-6. Monitor your pet’s response; if you notice digestive issues like diarrhoea or vomiting, slow the process down and remain at a 50-50 ratio for a bit longer.
Step 5: Move to 100% New Food
After about a week (or up to two weeks for sensitive pets), you should reach a point where your pet is comfortably eating 100% of the new food. Keep an eye on their stool quality, energy levels, and appetite. If everything seems normal, you’ve successfully completed a healthy pet food transition!
Tips for Avoiding Digestive Upsets
Go Slow: If you’re concerned about how to switch dog food without stomach upset, the key is patience. Rushing the transition can lead to vomiting, diarrhoea, or loss of appetite.
Add Probiotics: Consider introducing pet-safe probiotics or digestive enzymes to help maintain gut health, particularly for sensitive cats and dogs.
Hydration is Key: Offer plenty of fresh water, especially if you’re switching from wet food to kibble or vice versa.
Watch for Allergies: If you notice itching, skin rashes, or recurring ear infections, consult your vet to see if the new diet might be causing an allergic reaction.
Common Mistakes to Avoid
Sudden Changes: Never switch from one food to another overnight. It can upset your pet’s stomach and lead to poor acceptance of the new food.
Overfeeding: Keep an eye on portion sizes. Sometimes, when introducing a new food, owners accidentally overfeed because they’re not measuring carefully.
Ignoring Individual Needs: Every pet is unique. A dog food transition guide won’t necessarily be one-size-fits-all for every breed, and the same goes for a cat food transition guide.
FAQs: Your Pet Food Transition Questions Answered
Below are some frequently asked questions to help guide your smooth food transition for pets:
1. How long does it take to transition dog food?
It generally takes 7-10 days to switch dog food, but for sensitive dogs, you may want to extend the transition period to two weeks. Monitor for signs of an upset stomach, and slow down if necessary.
2. Can I use the same transition timeline for my cat?
Yes, cats typically do well with a 7-10 day timeline as well. If you’re doing a step-by-step cat food transition for sensitive stomachs, don’t hesitate to stretch it out to two weeks to avoid digestive distress.
3. What if my dog or cat refuses to eat the new food?
Some pets are picky eaters. Try warming up wet food slightly or adding a small amount of low-sodium bone broth (for dogs) or fish broth (for cats) to make the new food more appealing. If refusal persists, consult your vet for alternatives.
4. Should I be worried if my pet has soft stools during the transition?
It’s normal to see mild changes in stool consistency when changing your pet’s diet. However, persistent diarrhoea or vomiting is a red flag. If these symptoms last more than a day or two, contact your veterinarian.
5. Can I switch between wet and dry food using the same method?
Absolutely. The same gradual diet change for pets applies whether you’re moving from kibble to canned, canned to kibble, or even between two different textures or brands.
6. Do I need to add supplements when transitioning pet food?
Not necessarily. If you’re feeding a nutritionally complete and balanced diet, supplements may not be required. However, some pets benefit from pet nutrition tips like probiotics or omega-3 fatty acids. Always check with your vet before introducing new supplements.
When to Seek Veterinary Help
If your dog or cat experiences persistent digestive issues (vomiting, diarrhoea, or complete loss of appetite) beyond the initial few days of transition, consult your veterinarian. They can rule out underlying health issues, suggest a slower transition pace, or recommend a different diet altogether.
Conclusion
Switching your pet’s food doesn’t have to be an overwhelming ordeal. By following this step-by-step pet food transition guide, you can avoid digestive issues in pets and keep them happy, healthy, and well-fed. Whether you’re learning how to switch dog food without stomach upset or mastering a step-by-step cat food transition for sensitive stomachs, the key is to go slow, stay attentive, and prioritise your pet’s comfort.
With these tips in mind, you’ll be well on your way to ensuring a smooth food transition for pets—and giving your furry family member the best possible diet for their unique needs.
Looking for a new food to switch your dog or cat to? Check out our range of nutritious dog food and cat food. We stock leading brands like Orijen, Acana and Proplan as well as many more - there’s sure to be something to tickle your pet’s taste buds.