It’s easy to forget to wash your dogs collar, and there’s nothing worse than a freshly washed dog in a smelly dog collar. Cleaning their collar doesn’t have to be a chore and can be quick and easy to prolong the life of the collar and keep your dog smelling fresh!
It may be worth getting a second collar so you have a collar for your dog to wear whilst another is being washed. Cleaning your dog collar every now and then is worth your time to keep your dog happy and healthy. There’s no specific frequency you should change and wash your dogs collar, but when you check the sizing of the collar, it might be worth to check if the collar is still smelling fresh too.
[product]
How To Clean A Smelly Dog Collar
A lot of collars are hand wash only due to the soft and durable webbing used - and although it’s tempting, try not to just put your dog collar in the washing machine (or in the dishwasher as some advice might suggest!). Check the washing instructions on your dogs collar for wash instructions and if you’re able to wash the collar in the washing machine. If your collar is 'hand wash only’ use warm water and a mild dog shampoo to ensure the collar won’t irritate your dog once returned around their neck. Let the dog collar soak in the soapy water for 10-20 minutes and lightly brush the collar if there is a build up of dirt. Be careful not to damage the collar with a harsh/vigorous brushing. Don’t forget to pay attention to any buckles to remove any build up of dirt and grime. Once the collar is clean, rinse with clean water and leave to dry completely before returning this to your dogs neck.
[product]
How Often Should You Wash A Dog Collar?
There isn’t a set time scale on when you should wash your dogs collar, as this will depend on your dog and if they enjoy swimming, rolling in mud or if you remove their collar whist being at home! It’s good practice to check your dogs collar frequently to ensure the size of the collar fits them comfortably - so you may want to check at this point if the collar needs a wash. Set a reminder for yourself to wash the collar seasonally, if you don’t find the collar has built up with dirt in the meantime. It also may be useful to check the collar once your dog has been groomed. There is nothing worse than a freshly groomed dog with a dirty, smelly collar!
[product]
How To Clean A Smelly Leather Dog Collar
Leather can be quite a sensitive material and should be prevented from soaking in water for a long period of time. To clean the collar, simply wet the collar with warm water and gently clean the collar with a mild dog shampoo. Rub the collar gently to remove any dirt or grime focusing on any buckles and stitching where dirt can gather. After washing, pat the collar dry and use a soft towel to soak up the excess of water. Then leave to dry naturally before returning to your dogs neck. Try not to leave the collar drying in the sun as sunlight can cause the leather to crack. As you cannot soak a leather collar in water for a long period of time, it is advisable to clean the collar regularly. Cleaning your leather collar often, means it won’t get too soiled and smelly.
How To Wash A Dog Collar In The Washing Machine
Check the collars washing instructions before you pop the collar into the washing machine like you would their bedding - as some collars are hand wash only and machine washing them can cause irreparable damage. If you can wash your dogs collar in the washing machine, we’d recommend popping it into a washing bag (or a sock/pillow case) so that any metal work/buckles are protected and doesn’t make a banging sound whilst in the machine. Once you’ve washed the collar using the manufacturers recommendations, leave the collar to dry naturally before putting back on your dogs neck.
If you’re looking for a new collar, you can shop our.designer collars here
It’s easy to forget to wash your dogs collar, and there’s nothing worse than a freshly washed dog in a smelly dog collar. Cleaning their collar doesn’t have to be a chore and can be quick and easy to prolong the life of the collar and keep your dog smelling fresh!
It may be worth getting a second collar so you have a collar for your dog to wear whilst another is being washed. Cleaning your dog collar every now and then is worth your time to keep your dog happy and healthy. There’s no specific frequency you should change and wash your dogs collar, but when you check the sizing of the collar, it might be worth to check if the collar is still smelling fresh too.
How To Clean A Smelly Dog Collar
A lot of collars are hand wash only due to the soft and durable webbing used - and although it’s tempting, try not to just put your dog collar in the washing machine (or in the dishwasher as some advice might suggest!). Check the washing instructions on your dogs collar for wash instructions and if you’re able to wash the collar in the washing machine. If your collar is 'hand wash only’ use warm water and a mild dog shampoo to ensure the collar won’t irritate your dog once returned around their neck. Let the dog collar soak in the soapy water for 10-20 minutes and lightly brush the collar if there is a build up of dirt. Be careful not to damage the collar with a harsh/vigorous brushing. Don’t forget to pay attention to any buckles to remove any build up of dirt and grime. Once the collar is clean, rinse with clean water and leave to dry completely before returning this to your dogs neck.
How Often Should You Wash A Dog Collar?
There isn’t a set time scale on when you should wash your dogs collar, as this will depend on your dog and if they enjoy swimming, rolling in mud or if you remove their collar whist being at home! It’s good practice to check your dogs collar frequently to ensure the size of the collar fits them comfortably - so you may want to check at this point if the collar needs a wash. Set a reminder for yourself to wash the collar seasonally, if you don’t find the collar has built up with dirt in the meantime. It also may be useful to check the collar once your dog has been groomed. There is nothing worse than a freshly groomed dog with a dirty, smelly collar!
How To Clean A Smelly Leather Dog Collar
Leather can be quite a sensitive material and should be prevented from soaking in water for a long period of time. To clean the collar, simply wet the collar with warm water and gently clean the collar with a mild dog shampoo. Rub the collar gently to remove any dirt or grime focusing on any buckles and stitching where dirt can gather. After washing, pat the collar dry and use a soft towel to soak up the excess of water. Then leave to dry naturally before returning to your dogs neck. Try not to leave the collar drying in the sun as sunlight can cause the leather to crack. As you cannot soak a leather collar in water for a long period of time, it is advisable to clean the collar regularly. Cleaning your leather collar often, means it won’t get too soiled and smelly.
How To Wash A Dog Collar In The Washing Machine
Check the collars washing instructions before you pop the collar into the washing machine like you would their bedding - as some collars are hand wash only and machine washing them can cause irreparable damage. If you can wash your dogs collar in the washing machine, we’d recommend popping it into a washing bag (or a sock/pillow case) so that any metal work/buckles are protected and doesn’t make a banging sound whilst in the machine. Once you’ve washed the collar using the manufacturers recommendations, leave the collar to dry naturally before putting back on your dogs neck.
Have you ever found yourself relaxing on the sofa with your furry companion curled up beside you, softly vibrating with that unmistakable cat purring sound? Whether it's a gentle hum while they snooze or a loud, contented rumble when they're being stroked, cats and purring go hand in hand. But have you ever wondered—why do cats purr? Let’s dive into the world of feline communication to uncover the mystery behind this soothing sound.
The Science Behind the Purr Sound
A purr sound is produced by a cat’s laryngeal muscles, which twitch at a rapid rate—around 25 to 150 vibrations per second. This movement causes a separation of the vocal cords, producing the familiar rhythmic hum we all adore. Interestingly, the sound is created both when a cat inhales and exhales, making it a continuous, comforting presence.
Why Do Cats Purr? The Many Meanings of This Feline Sound
Cats purr for a variety of reasons, and while it’s commonly associated with contentment, the truth is that it serves multiple purposes. Let’s explore some of the key reasons:
1. Contentment and Relaxation
The most well-known reason for cat purring in sleep or during petting sessions is sheer happiness. When a cat is comfortable, feeling safe, and loved, purring serves as a signal of satisfaction. If your feline friend is snuggled up in their favourite spot, enjoying some downtime, their purring is likely a sign of total relaxation.
2. Communication with Their Humans
Cats use their purrs to communicate with us. Have you ever noticed that your cat’s purr sounds slightly different when they’re hungry? Studies suggest that some cats produce a more urgent purr, sometimes mixed with a soft meow, to grab your attention when it’s mealtime.
3. Self-Soothing and Healing
One fascinating aspect of cats and purring is its potential health benefits. Purring has been linked to self-soothing, helping cats calm themselves in stressful situations. What’s more, the frequency of a cat’s purr is believed to have healing properties, aiding in bone growth and tissue repair. This explains why cats might purr when they are injured or feeling unwell.
4. Bonding with Kittens
If you’ve ever heard kitten purring, you’ll know that it’s one of the sweetest sounds. From the moment they are born, kittens purr to bond with their mothers. This purring reassures their mother that they are safe and content, while also helping them stay close during nursing.
5. Stress and Anxiety Relief
Surprisingly, cats might purr when they are stressed or anxious. If your cat is in an unfamiliar environment or feeling uneasy, purring can act as a coping mechanism, helping to reduce their stress levels.
6. Seeking Attention
If your cat starts purring the moment you walk through the door, they’re likely seeking your attention. Whether they want food, playtime, or simply some affection, purring is a feline’s way of saying, "Notice me!"
Kitten Purring Meaning: What to Expect from Your Young Cat
If you’re the proud owner of a young feline, you might be curious about kitten purring meaning. Kittens begin purring at just a few days old, often as a way to bond with their mother. As they grow, their purring may develop into a way to express contentment, seek comfort, or even indicate when they’re feeling playful.
Kittens often purr when being stroked, feeling full after a meal, or settling down for a nap. It’s their way of showing they feel safe and secure in their environment.
Why Does My Cat Purr in Their Sleep?
You might have noticed your feline producing a cat purring sound while they’re fast asleep. This typically indicates deep relaxation and a feeling of security. However, just like humans talk in their sleep, cats may purr due to dreams or subconscious processing of their day’s experiences.
If your cat purrs loudly while sleeping, it’s likely they’re in a particularly deep and peaceful state. Some experts also believe that purring during sleep might help with muscle relaxation and recovery.
How to Encourage a Happy Purring Cat
If you love the sound of your cat’s purr, there are a few ways to encourage it:
Create a safe environment: Provide cosy spots, such as a plush cat bed or a cat tree, where your feline can feel secure.
Offer gentle affection: Many cats enjoy head rubs, chin scratches, and soft petting, which can trigger contented purring.
Provide tasty treats: A happy cat is often a purring cat, and rewarding them with delicious treats can encourage more of those lovely vibrations.
Interactive play: Engaging your cat with toys and games helps build their confidence and deepen your bond.
Conclusion
Cats and purring go together like peanut butter and jelly. While purring is often a sign of happiness, it can also serve a variety of other purposes, from communication to self-soothing and healing. Whether you’re listening to the gentle hum of kitten purring or the steady rhythm of your senior cat’s purr, understanding their sounds helps you build a stronger bond with your furry companion.
If you want to create the perfect environment for your cat to relax and purr away, be sure to check out Lords & Labradors' range of luxurious cat essentials, including plush beds, cat trees, and tasty treats.
So, next time your feline friend starts their soothing hum, you’ll know they’re communicating with you in the most delightful way!
If you’ve ever heard the phrase “terrible twos,” you’ll know it often refers to that stage in a toddler’s life when they’re full of mischief, testing boundaries, and prone to the occasional tantrum. But does this apply to our furry friends too? The short answer: yes and no. While puppies don’t technically reach the “terrible twos” in the same sense as human toddlers, they do go through phases—particularly around six months to adolescence—where “challenging” puppy behaviour can rear its head. In this blog, our Pet Experts explore why your puppy may seem to have entered a rebellious stage, how to tackle common issues like how to stop puppy biting, and why consistency, patience, and the right products from Lords & Labradors can make all the difference.
The ‘Terrible Twos’ in Puppy Terms
When people talk about “puppy terrible twos,” they’re usually describing an adolescent phase where your pup’s confidence grows, and they become more curious and—let’s face it—a bit cheeky. This phase often begins around the six-month mark and can last until they’re about one to two years old. During this time, you may notice:
Excessive chewing or biting, sometimes due to teething or boredom.
Aggressive behaviour in puppies, which could be playful nipping turning more forceful, or resource guarding.
Increased energy levels, leading to more excitement or boisterous play.
Selective hearing, where once well-trained commands suddenly seem forgotten.
I remember my own pup, Richmond, suddenly deciding at seven months that the sofa cushions were his favourite chew toy—despite weeks of perfect behaviour beforehand! It felt like an overnight change, but in reality, Richmond was just testing his boundaries.
Why the Change Happens
Hormones & Maturity: As puppies grow, their hormones kick in. This can lead to heightened energy, exploratory behaviour, and sometimes even territorial displays.
Teething & Discomfort: Around six months, many puppies experience the final stages of teething, which can result in chewing or nipping as they try to alleviate gum pain.
Social Development: Puppies start to understand pack hierarchy. They may push boundaries to see what they can get away with—much like a human teenager challenging curfews.
6 Month Puppy Behaviour: What to Expect
By the time your puppy reaches six months old, you might notice some common changes:
Testing Limits: They may ignore cues like “sit” or “stay,” even though they seemed to have them mastered at 12 weeks.
Exploratory Chewing: This can manifest in chewing furniture, shoes, or anything within reach—especially if they’re bored.
Heightened Play Biting: Playful nips can become a bit stronger, raising questions about how to stop puppy biting effectively.
While these changes can be frustrating, remember that they’re normal developmental stages. Your puppy isn’t being “bad” on purpose; they’re simply growing up and learning.
Tips on Managing “Terrible Twos” Behaviour
1. Consistent Training
Reinforce basic commands daily—“sit,” “stay,” “down”—and ensure everyone in your household is on the same page. Mixed messages can confuse your puppy, leading to inconsistent behaviour.
2. Positive Reinforcement
Reward the behaviours you want to see. Treats, praise, or even a quick play session with a favourite toy can reinforce good manners. Avoid punishment-based training, as it can lead to fear or aggressive behaviour in puppies. Make sure you have plenty of puppy training treats to hand so you can reward any positive behaviour!
3. Mental Stimulation
One of the best ways to curb unwanted puppy terrible twos behaviour is to keep their minds occupied. Puzzle toys, interactive feeders, and regular training sessions help burn mental energy and reduce boredom-related mischief. We love the Nina Ottosson interactive dog toys, they’re perfect for keeping growing pup’s minds stimulated
4. Physical Exercise
A tired puppy is often a well-behaved puppy. Regular walks, play sessions, and even safe puppy agility can help release pent-up energy. Remember not to overdo it, especially with large-breed puppies whose joints are still developing.
5. Appropriate Chew Toys
Provide safe and durable chew toys to satisfy their natural urge to chew—especially helpful for teething. We have a range of teething toys and accessories designed to soothe sore gums and redirect chewing behaviour away from your household items. The KONG puppy range is especially great for teething puppies as it is specially formulated to be strong and durable against them shark teeth.
How to Stop Puppy Biting
Puppy biting is one of the most common complaints during the “terrible twos.” Here’s how you can tackle it:
Redirect: If your puppy nips at your hands or feet, immediately offer a chew toy. This teaches them what’s acceptable to bite—and what isn’t.
Positive Corrections: A gentle “ouch” or yelp can mimic how puppies let each other know a play bite is too hard. Then, stop interaction momentarily to show that biting ends the fun.
Reward Calm Behaviour: The moment your puppy licks or plays gently, reward them with praise or a small treat. Reinforcing the behaviour you want is key.
Use Training Aids: There are helpful aids such as bitter sprays that deter chewing on furniture and certain toys. We love the Simple Solutions Chew Stopper, the unpleasant taste of the spray makes your puppy associate whatever they’re chewing with that taste so they won’t want to chew it anymore.
Managing Aggressive Behaviour in Puppies
Although true aggression in puppies is relatively rare, certain behaviours may appear aggressive—like growling or snapping. Often, these are signs of fear, over-excitement, or resource guarding. Consider the following:
Seek Professional Advice: If you’re concerned about genuinely aggressive behaviour in puppies, consult a qualified dog trainer or vet. They can identify underlying causes and offer tailored solutions.
Early Socialisation: Make sure your puppy experiences various environments, people, and gentle dogs to reduce fear-based reactions later.
Identify Triggers: Does your puppy growl over their food bowl or toys? Start by teaching them that hands near the bowl or toy mean treats, not threats.
Lords & Labradors Puppy Essentials
At Lords & Labradors, we understand how exciting—and sometimes overwhelming—puppy parenthood can be. That’s why we offer a dedicated Puppy Homepage filled with everything you need for your new furry family member including:
Teething Toys: Specially designed to soothe sore gums and reduce the urge to bite.
Training Essentials: From clickers and treat pouches to puppy-safe crate bedding.
Calming Aids: Products that help soothe anxious pups or those struggling with new experiences.
For more tips from our team of pet experts, head to our Puppy Section on our Information Hub. You’ll find plenty of informative blog posts on how to navigate each stage of puppyhood.
Frequently Asked Questions
When does puppy “terrible twos” typically start?
It can begin as early as six months and continue until about a year or two, depending on the breed and individual temperament.
How do I deal with constant nipping?
Consistency is key. Offer a chew toy when your puppy attempts to nip, and calmly end the play session if they don’t stop. Praise them as soon as they lick or chew appropriately.
Will my puppy’s sudden rebellious streak pass on its own?
With consistent training and patience, most challenging puppy behaviour eases as they mature. However, reinforcing good habits is essential to ensure they become a well-behaved adult dog.
What if my puppy shows signs of aggression towards people or other dogs?
True aggression in puppies can stem from fear or a lack of socialisation. Seek help from a vet or qualified trainer to identify triggers and work on a behaviour modification plan.
How much exercise does a six-month-old puppy need?
This varies by breed, but generally, two short walks a day plus some playtime are recommended. Always monitor for signs of fatigue, as young joints are still developing.
Final Thoughts
The puppy terrible twos can be challenging, but they’re also a natural—and often short-lived—part of growing up. Understanding 6-month puppy behaviour, knowing how to stop puppy biting, and addressing potential aggressive behaviour in puppies all come down to patience, consistent positive reinforcement, and the right tools. By investing in quality teething toys, training essentials, and exploring professional advice when needed, you’ll guide your pup through these tumultuous months into a confident, well-behaved adult.
Feeling ready to tackle puppyhood head-on? Don’t forget to browse our Puppy Emporium, which is full of the essentials you need to transform the "terrible twos". With the right balance of love, structure, and patience, you’ll transform those “terrible twos” into terrific memories in no time!
Few things throw off a walk quite like a dog who plants their paws and flatly refuses to go the direction you had in mind. If your dog refuses to walk certain directions, there’s nearly always a reason behind it, whether that’s fear, discomfort, or simply a strong opinion about where the good smells are. This guide covers how to tell those causes apart, what you can do to gently build confidence back up, and when it’s worth calling in a vet or behaviourist for extra support.
Why your dog suddenly refuses to walk one way
If your dog suddenly plants their paws and refuses to move in a certain direction, it can feel completely baffling — especially when they were perfectly happy heading that way last week. But this is rarely stubbornness. Most of the time, your dog is trying to tell you something.
Dogs build strong associations with the places they visit, and those associations can form faster than you might expect. A route that takes you past a noisy building site, a garden where a dog charges the fence, or even a spot where something once startled them can quickly become somewhere they’d rather avoid. When your dog stops walking or pulls back on the lead heading a particular way, that’s communication, not defiance.
It’s also worth taking seriously. The more often a dog is pushed through something that worries them, the stronger that negative association tends to become. Understanding what’s driving the behaviour, on the other hand, gives you a real chance to actually help.
The signals are usually there if you know what to look for: a tucked tail, flattened ears, a sudden reluctance to move forward, or frantic sniffing to avoid making eye contact with whatever’s ahead. These are all your dog’s way of saying “I’m not sure about this.” Our guide to understanding your dog’s body language is a great starting point if you’d like to get better at reading those cues before we dig into the causes.
The most common reasons dogs avoid certain routes
There’s almost always a reason when a dog refuses to walk certain directions, even if it isn’t immediately obvious. Dogs can’t tell us what’s wrong, so their behaviour on the lead is often the clearest signal we have. Pinning down the cause is the first step to making walks enjoyable again for both of you.
Fear or negative associations. A dog that freezes outside a particular house, digs their paws in near a certain gate, or turns back at the same point every time has often had a bad experience there. It might have been something that only happened once — a sudden loud noise or an unexpected run-in with another dog — but the memory sticks. That reluctance isn’t defiance. It’s self-protection.
Stubbornness or personal preference. Some dogs simply have opinions about where they want to go. One that consistently pulls toward home, or always steers for the park and resists anywhere else, is usually showing a preference rather than fear. It’s especially common in dogs who’ve settled into a comfortable routine and aren’t particularly interested in anything that disrupts it.
Overstimulation from busy environments. A dog that shuts down near traffic or crowded streets is often overwhelmed, not difficult. The noise, movement, and unpredictability can become genuinely too much to process. Dogs pushed past their threshold may also start barking on walks, which is worth paying attention to as another sign that they’re struggling.
Physical pain or discomfort. If your dog slows right down, starts labouring on a slope, or suddenly stops after turning a particular corner, pain could easily be the reason. Rough surfaces, uneven ground, or an underlying joint issue can all make certain routes feel uncomfortable in ways that are easy to miss until you know what to look for.
Each of these behaviours is your dog’s way of trying to tell you something. Recognising which pattern fits yours is where the real progress begins.
How to tell fear, pain, and simple preferences apart
When a dog refuses to walk certain directions, the behaviour usually falls into one of three categories: fear, physical discomfort, or a plain old preference. The good news? Your dog’s body language will often tell you which one you’re dealing with — you just need to know what to look for.
Signs it may be fear or anxiety
Ears flattened against the head
Tail tucked under the body
Panting without any physical exertion
Freezing mid-walk and refusing to budge
Whale eye (whites of the eyes showing)
Pulling back hard on the lead
Barking or lunging at a specific spot on the route
Signs it may be pain or physical discomfort
Stopping suddenly at the same point on a familiar route
Limping or favouring one leg
Reluctance to put weight on a paw
Slowing pace noticeably over time
Whimpering or vocalising when encouraged to move forward
Stiffness after resting, particularly in older dogs
Worth knowing: Fear responses are usually triggered by something your dog sees, hears, or smells. Pain responses tend to be consistent, progressive, or tied directly to movement.
Simple preferences are a different thing entirely. If your dog enthusiastically pulls toward their favourite sniff spot or drags you down a familiar street with their tail up and body relaxed, that’s not a red flag — that’s just a dog with opinions. But if you’re noticing persistent freezing, any hint of lameness, or a sudden shift in how your dog behaves on walks, it’s worth a vet visit to rule out anything physical before you do anything else.
Gentle training steps to rebuild confidence on tricky walks
If your dog refuses to walk certain directions, think of confidence-building as lots of tiny wins rather than one big breakthrough. The goal is to help them feel safe enough to choose forward movement again.
Keep early walks short and successful. Pick a route your dog already copes with and end before they feel overwhelmed. A calm five-minute outing is far more useful than a stressful twenty-minute one.
Reward the choice to move. If your dog stops walking on walks or pulls back on the lead, watch for the smallest brave decision: one step forward, a relaxed glance at the trigger, or choosing to sniff and re-engage. Mark that moment with a treat or warm praise.
Start farther away than you think. When a dog won’t walk in one direction, there is usually a point where they still feel okay. That is where training starts. If the post box, corner, or noisy road is too much, move back until their body softens, then build up gradually over several sessions.
Make things predictable. Familiar routes, similar walk times, and a steady pace help nervous dogs settle. Once they are moving happily again, you can gently add in new directions.
Use comfortable walking kit. A loose lead and a well-fitted harness can reduce pressure and help your dog feel more secure during desensitisation work. If you are reviewing your setup, a padded walking collection is a helpful example of softer, supportive kit.
Stay consistent and calm. Your dog does not need perfect walks. They just need regular, low-pressure practice.
Desensitisation means exposing your dog to the scary or tricky thing at a level they can cope with, then very slowly increasing the challenge as their confidence grows.
When to speak to a vet or behaviourist
Sometimes the kindest thing you can do is ask for help. If your dog refuses to walk certain directions and nothing you try seems to be making a difference, it’s a good sign that some expert guidance is in order.
Start with your vet, especially if the refusal came on suddenly or out of nowhere. If your dog is also limping, slowing down on walks, or seeming stiff and reluctant at home, pain could easily be the culprit. Conditions like arthritis, soft tissue injuries, or sore paws can be surprisingly easy to miss, and they can look a lot like stubbornness from the outside. A quick health check rules out anything physical before you turn your attention to behaviour.
If your vet gives the all-clear but your dog still pulls back on the leash, freezes, or refuses to go a certain way, a qualified behaviourist is your next call. This is particularly important when the avoidance feels emotional — rooted in fear or anxiety — because pushing through those moments without the right guidance can deepen the problem rather than resolve it.
Look for someone accredited by the ABTC or APBC who uses positive, reward-based methods. A good behaviourist will work at your dog’s pace, help you understand what’s really going on, and give you a practical plan to move forward. Most dogs do get there with the right support behind them.
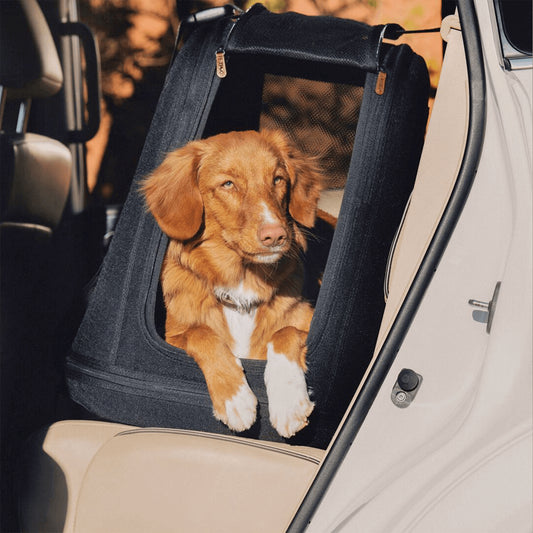
Planning air travel with your large furry companion feels overwhelming at first, but understanding how big dogs travel on planes becomes much simpler once you know the essentials. From selecting the perfect travel crate and navigating airline policies to preparing your gentle giant for the journey ahead, this guide walks you through every step of making air travel a comfortable experience for both you and your beloved pet. With the right preparation and knowledge, you’ll transform what seems like a daunting process into a manageable adventure that gets your four-legged family member safely to your destination.
Understanding Airline Policies for Big Dogs
When you’re planning to fly with your gentle giant, understanding how big dogs travel on planes starts with accepting that most large breeds simply won’t squeeze into the cabin with you. While airlines typically welcome pets under 20 pounds in carriers beneath the seat, your Labrador, German Shepherd, or Golden Retriever will need to journey in the aircraft’s pressurized cargo hold.
Every airline writes its own rulebook for large dog travel, so dig into specific policies well before you book anything. British Airways accepts dogs up to 75kg including their crate, while Virgin Atlantic sets slightly different limits. Most major carriers require advance reservations for pet cargo—sometimes weeks ahead during peak travel times when everyone seems to be flying with their four-legged family members.
Here’s some reassuring news: cargo holds on passenger planes are pressurized and climate-controlled, just like where you’ll be sitting. Your dog won’t endure a cold, dark journey below. That said, airlines often impose seasonal restrictions during extreme weather to protect pets from temperature swings during ground handling—those tarmac waits can be brutal in July or January.
Size rules extend beyond simple weight calculations. Airlines measure your dog and travel crate together, making a well-fitted carrier crucial for meeting requirements. While some carriers restrict certain breeds due to breathing issues, this typically affects flat-faced dogs like bulldogs rather than most large breeds.
International travel brings extra layers of paperwork and planning. EU destinations require pet passports, while countries like Australia mandate lengthy quarantine periods. Contact your destination’s agricultural department months ahead—these requirements aren’t suggestions, and last-minute scrambling rarely ends well.
Here’s something learned through experience: always book directly with airlines when traveling with pets. Third-party booking sites often miss crucial details about pet reservations, leaving you stranded at check-in. Direct booking also lets you communicate special needs and ensures your dog’s spot is properly secured, which matters since many airlines limit pets per flight.
Budget carriers frequently don’t accept pets at all, while premium airlines usually offer more thoughtful pet services. When comparing options, consider the airline’s animal transport reputation alongside their pet fees—your dog’s comfort and safety are worth the extra research.
Choosing the Right Travel Crate for Your Big Dog
Your crate choice can make or break your big dog’s flying experience. Airlines will turn dogs away at check-in if their crate doesn’t meet strict safety standards, and even if you clear that hurdle, the wrong crate puts your furry friend at risk during the flight. Getting this decision right protects both your travel plans and your dog’s wellbeing.
When selecting a travel crate for your large dog, focus on these essential features:
IATA approval certification - Look for the official International Air Transport Association stamp, which ensures the crate meets global airline standards
Adequate ventilation on multiple sides - Your dog needs proper airflow during the journey, with ventilation openings covering at least 16% of the total wall space
Heavy-duty latching system - Secure metal latches and bolts prevent accidental opening during baggage handling
Proper sizing with room to move - Your dog should be able to stand, turn around, and lie down comfortably without the crate being oversized
Reinforced construction materials - Sturdy plastic or fiberglass construction that can withstand the rigors of cargo handling
Leak-proof bottom design - Prevents accidents from affecting other cargo and keeps your dog comfortable
Here’s what many pet parents don’t realize: your dog will likely spend hours in this crate, from check-in through baggage claim. That’s why comfort features matter just as much as safety requirements. Quality travel crates designed specifically for large breeds address both needs seamlessly. The Lords & Labradors Silver Deluxe Dog Crate collection exemplifies this balance, offering sizes up to XXL with airline-compliant features that give pet parents confidence when preparing big dogs for air travel.
Think of the right crate as more than just meeting airline requirements. It becomes your dog’s safe haven during the stressful airport experience, giving them a familiar, secure space when everything else feels overwhelming.
Preparing Your Big Dog for Air Travel
Getting your large dog ready for air travel takes patience and planning, but the effort pays off when you see your furry friend handle the journey with confidence. The key to understanding how big dogs travel on planes successfully lies in thorough preparation—it’s what transforms a potentially stressful ordeal into a manageable adventure for everyone involved.
Essential Preparation Steps:
Start crate training 4-6 weeks early - Begin with short periods in the travel crate during meal times, gradually increasing duration until your dog sees it as their cozy den, not a prison. My friend Sarah’s Golden Retriever initially whined for twenty minutes straight, but by week three, he was voluntarily napping in there.
Schedule a pre-travel vet visit - Most airlines require health certificates issued within 10 days of travel. Your vet can also recommend anxiety management strategies tailored to your dog’s personality—some dogs benefit from compression wraps, while others need prescription calming aids.
Practice airport sounds and scenarios - Play recordings of plane engines, airport announcements, and bustling crowds at home while your dog relaxes in their crate. YouTube has excellent “airport ambiance” videos that work perfectly for this desensitization training.
Introduce familiar comfort items - Pack a well-loved blanket or your old t-shirt in the crate. These familiar scents provide reassurance when everything else feels foreign and overwhelming.
Adjust feeding schedule gradually - Start feeding your dog 4-6 hours before departure time in the weeks leading up to travel. This prevents motion sickness and gives their digestive system time to adapt to the new routine.
Consider calming supplements - If your dog tends toward anxiety, discuss natural calming aids with your vet well before travel day. Testing effectiveness takes time—you don’t want to discover on departure morning that melatonin makes your pup drowsy instead of calm.
Practice car trips to simulate travel day - Load the crate in your car for progressively longer drives, mimicking the transport experience to the airport.
Planning Timeline: Start preparation 4-6 weeks before your departure date. This timeline gives your dog space to adjust gradually and lets you identify any issues early enough to address them properly.
Every dog adapts differently to new experiences, so watch for your pet’s individual responses and adjust accordingly. Those weeks you invest in preparing your large dog for air travel create the foundation for a calmer, more confident traveler—and a much less anxious pet parent.
Packing Essentials for Your Dog’s Flight
Understanding how big dogs travel on planes successfully starts with smart packing—the difference between a nerve-wracking journey and one where you can breathe easy knowing your pup has everything they need. Since your large dog will spend the flight in cargo, every item you pack becomes their lifeline to comfort and safety during those hours apart from you.
What to pack for your big dog’s flight:
Familiar bedding or blanket - That old throw from the couch that smells like home? Perfect. It’ll provide emotional comfort when everything else feels unfamiliar
Spill-proof water and food dishes - Attach these securely to the crate door so ground crew can refill them without opening the crate
24-hour food supply - Pack extra kibble in a clearly labeled bag attached to the crate—flight delays happen, and you want your dog fed on schedule
Favorite comfort toy - Choose something sturdy that won’t fall apart if they get anxious and give it extra attention
Complete health documentation - Vaccination records, health certificates, and your vet’s contact info, all in a waterproof pouch
Emergency contact card - Your phone number, destination details, and any special care instructions clearly written and attached to the crate
Absorbent bedding material - Layer puppy training pads or newspaper under their blanket for accidents during the long journey
Backup leash and collar with ID tags - Pack extras with current contact details—things can get misplaced during baggage handling
Important: Airlines require water and food dishes to be accessible from outside the crate without opening the door. This isn’t just bureaucracy—it’s how ground crew can care for your dog during layovers.
While products like our Ultimate Weekaway Bag work beautifully for small dogs traveling in-cabin, big dog parents need to pack everything directly into or onto the travel crate itself. Think of the crate as your dog’s temporary home—stock it like you would for an overnight stay.
Navigating the Airport with Your Big Dog
Airport procedures for large dogs require more time and coordination than flying with smaller pets, but with the right preparation, you can navigate the process smoothly. Unlike small dogs that travel in the cabin, your big dog will go through a specialized check-in process that involves multiple departments and additional paperwork.
Here’s the step-by-step airport process for flying with large dogs:
Arrive at least 3-4 hours early for domestic flights and 4-5 hours for international travel to allow extra time for paperwork and crate inspection
Complete check-in at the special services counter where airline staff will review your dog’s health certificates, verify crate requirements, and process cargo documentation
Proceed to the designated pet drop-off area where your dog’s crate will be inspected and your pup will be transferred to the cargo handling team
Complete your own security screening and head to your gate, knowing your dog is in professional hands
Board your flight with the peace of mind that your dog was loaded safely onto the same aircraft
Keep your large dog calm during airport hustle with these tried-and-true strategies:
Pack familiar items like their favorite blanket or toy in an organized travel bag to provide comfort during the check-in process
Take frequent potty breaks in designated pet relief areas before the final crate time
Speak in soothing tones and maintain your usual calm energy—our dogs are emotional mirrors, picking up on every bit of our stress
Bring high-value treats to reward good behavior during inspections and handling
Consider using calming supplements recommended by your vet if your dog is particularly anxious
I’ll be honest: patience is your secret weapon here. Airport staff handling large dogs know their stuff, but procedures naturally take longer than standard check-ins. When you build in that extra time buffer, you remove the pressure that makes both you and your dog tense. Your Golden Retriever doesn’t need to sense your panic about missing the flight on top of everything else they’re processing in that busy, unfamiliar environment.
Post-Flight Care for Your Big Dog
After touching down, your big dog will likely feel a mix of relief and disorientation. Just like we need a moment to collect ourselves after a long flight, your furry companion deserves some gentle care to help them transition back to solid ground.
Start with hydration. Offer small amounts of water every few minutes rather than letting them gulp down a whole bowl at once. Their stomach might be a bit unsettled from the journey, and you want to avoid any digestive upset on top of travel stress.
Once you’ve collected your luggage and found a quiet spot, give your dog a chance to stretch and relieve themselves. Airport pet relief areas are perfect for this, but if you’re already outside, any grassy area will do. Don’t be surprised if they seem a bit wobbly or clingy at first. My friend’s Golden Retriever, Max, practically glued himself to her side for the first hour after his cross-country flight.
Keep a close eye on their behavior over the next 24 hours. Some dogs bounce back immediately, while others might seem quieter than usual or have slightly different eating patterns. This is completely normal. Watch for excessive panting, lethargy that lasts more than a day, or any signs of illness that seem unusual for your dog.
Consider keeping their routine gentle for the first day or two. Short walks instead of long hikes, familiar foods, and plenty of rest will help them readjust. Remember, just like bringing home a new family member requires patience and care, helping your big dog recover from air travel is all about taking things slowly and following their lead.